Shhhh, we are here to reveal a few secrets you probably were not aware off regarding Windows 10 – and the good bit is that what we are about to tell you will drastically improve the performance of your personal computer or machine.
So, before we get started, one thing you must understand is that Microsoft Windows is not just a singular platform but is a complex interwoven web of sophisticated design and software. Each of its characteristics has been created by a dedicated group of engineers who laboured diligently to get it just right so we, as users, can have the best experience ever. Given its intricacy, it is no surprise that as end users, we do not know the little tips and tricks that can help optimise the performance of our devices that utilise Windows 10 as an operating system.
Here is a list of some techniques to help you get the ball rolling to improve your machine’s performance. Note that some have been embedded in the said operating system recently whilst others have been around for a while. Microsoft loves to update and does upgrade all its products constantly.
Hence, it is vital that we keep up!
1. Hidden Start Menu
Miss the older display version of the Start menu?
What if we told you that you can still access it and enjoy it?
High five!
Yes, you got it. All you have to do is right click on the Windows icon at the bottom left side of your screen.
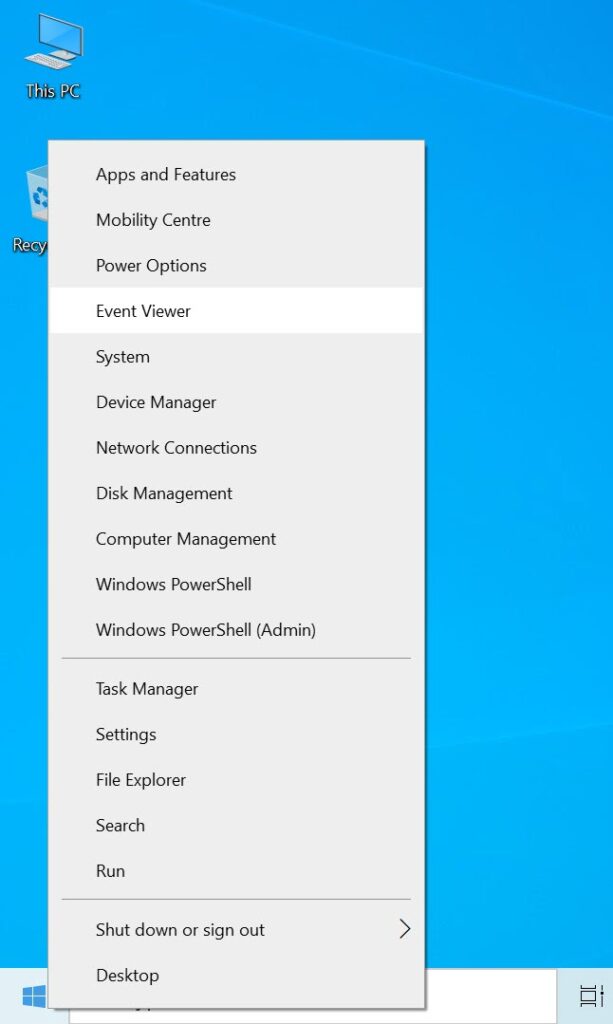
Once you do that, a text-based menu will come up and demonstrate a volume of your favourite applications and program. You can get to all these programs via the normal menu interface, but this text-based menu will help you get there a little faster.
2. Let’s Shake it
Got too many windows open? Steer your cursor to the top of the window you want to keep open and “shake” it to minimise all the others. Now, did you know about this? No worries, now you do! If you miss your other windows, just shake again in the same area and the others will come back. By the way, this feature has existed since the launch of Windows 7.
Surprising, isnt’ it?
3. Move Your Screen
You can change the direction of your screen by pressing CTRL+ALT+D and any of the arrow keys. The down arrow button will change it to an upside-down direction whilst the left or right arrow keys will move it 90 degrees to the side. Want it back to its normal position? Whoops, we don’t know how to do that! Just kidding, press the upwards arrow key and voila, your screen will go back to a normal upright position!
Another thing you can do is to right click on your desktop background and launch Graphics Options. Then select the Rotation option to move your screen in all possible ways. And yes, this feature has been there too since Windows 7, just like the preceding characteristic discussed above.
4. Snap Your Windows
Select the window of your choice and drag it to your preferred side of the screen where it will “fit” halfway. Under Windows 10, you can drag the window to the side and choose whether it will be cover half or quarter of your screen. Remember if you are using several different screens, take it to a border corner and be a little patient as you have to wait for a signal to appear that will indicate to you that the window is in the corner.
You can achieve the same or a similar result by utilising the Windows key plus in any of the directional arrow buttons.
5. Rapid Movement between Virtual Desktops
A round of applause please! Microsoft Windows has finally released the feature where you can multitask on your variant work projects and skip from virtual desktop to virtual desktop. And this is something that is only available on Windows 10. So, if you wish to benefit from this feature, you may want to upgrade your operating system to Windows 10- in case you already haven’t!
How can you do this? Click on Task View to isolate your open windows and application in to an iconic format. Then, choose which ones you wish to drag over to the area of your screen where it states, “new desktop”. This way, you can divide your work programs from personal ones. When you are out of Task View, you can access your different virtual desktops by holding down the Windows button with CTRL+right/left arrows simultaneously.
However, if you don’t like owning so many variant virtual desktops, you can remove it as well. Just return back to Task View and delete the singular virtual desktops. You’re good to go!
6. Demonstrate Desktop Button
Okay, this special feature goes back to Windows 7. At the bottom right side of your screen, lies a little treasure. Cannot see it? Sure? Look again. There is a small sliver of a semi-invisible icon. Click it and all your open windows will be minimised.
7. Taskbar Secrets
This is an extremely useful menu that will let you get to multiple apps at a quicker pace. It will let you access different presets for the tool bars, window schemes as well as Cortana. Just click away and explore to your heart’s content!
8. Tiles Secrets
If you wish to swiftly personalise the tiles on your machine, all you have to do is right-click on them to get a pop up menu to rise up. This particular menu will give you several alternatives such as letting you unpin programs from the Start menu, change the sizes of your open windows or to turn that live tile off. So many options, where do you start from?
Now that you are armed with so many tips and tricks, we are sure that you cannot wait to go give them a whirl! Best of luck! We hope this article was useful to you 😊
If you “hover” over this button, it will do the same thing, i.e., minimise your windows.